Indian Beauty & Fashion Blogger

Friday, September 30, 2016

Indian Bridal Makeup Tutorial Step By Step

Indian Bridal Makeup Tutorial Step By Step
Are you planning to become a bridal makeup artist in the next couple of years? It is a dream of every girl to look gorgeous on her wedding day and it will be your responsibility to make her look stunning. If you are new to bridal makeup, you should know the nitty-gritty of how to go about with the entire process step by step. There are numerous things to keep in mind like the skin of the bride, the texture that she wants, the makeup that would suit her, what shade would look best on her and several other subtle things. As the makeup artist, you will be the one to make sure that the bride looks the prettiest and the best on her Big-day. So, to help you out here is a complete step by step guide to prepare the bride on her wedding day.
SHARE:

Thursday, October 29, 2015

How to get the desired radiance with the all new Illamasqua Radiance Veil

Illamasqua Radiance Veil, How to get radiant skin, FOTD, how to get lit-up glow with Illamasqua Radiance Veil, Illuminator, makeup look, tutorial, Illamasqua, Picture tutorial, how to illuminate, Indian beauty blogger, how to use Illamasqua Radiance Veil, how to get glow, makeup tips, radiant skin with radiance veil, Indian makeup blog, chamber of beauty, makeup

Hey everyone,

After reading my Illamasqua Radiance Veil review, I'm sure you have guessed how much I love this product! It's amazingly versatile & as mentioned in the previous post, can be used in so many different ways. It offers the desired glow, shimmer & radiance to the skin that looks absolutely natural. Trust me, you are going to adore the healthy glow & finish that it provides. 

It's a medium coverage primer radiance that works brilliantly as a highlighter, illuminator and can also be mixed in with foundation to enhance the glow. One can even apply it all over the face before using the foundation.
SHARE:

Thursday, March 29, 2012

Eye makeup+tutorial(brown with turquoise eyeliner)

Hey everyone,
I recently tried out an EOTD, & so wanted to share a tutorial with my readers...hope you like it!


Tutorial

I used RBR Caress of Mink pigment in the centre of the lid, then on the outer corner I used a black shade from Max Factor eyeshadow Duo & then in the inner corner applied RBR Embrace of Cashmere pigment. Blended all 3 well!

Then for the lower lashline I used RBR caress of Mink pigment, then used Beautyuk Eyeliner in Oceania & Revlon Colorstay Kohl in the lower lashline. Finally I used false lashes & gave a touch of Loreal Extra Volume Collagen.


Final look


Products used


RBR Caress of Mink pigment- review
RBR Embrace of Cashmere pigment- review
Max factor Color Perfection Eyeshadow Duo
BeautyUk eyeliner- review
Loreal Extra Volume Collagen

SHARE:

Friday, November 4, 2011

And I was in a strange situation with just five things in hand....


 Some days ago, I had to face an interesting situation in my life, which taught me to do my makeup with some limited cosmetic products which at that time were present in my purse. Actually a few days ago we ( my hubby & I) decided to go for a long drive because the weather was so beautiful that day but while we are on our way, he remembered that he got an invitation from a colleague to a small get together party..oh it was really a strange situation. Our dresses were okay for a small party. I was in a black outfit but was without makeup as usual...at first I refused to go but then calmly looked inside my purse too see if there was anything useful and finally I got very few things which were not enough even for a simple makeup. But then I got an idea came to my mind and I decided to do some experiment. I did my makeup only with five things which I got in my purse. W,hen I saw my final look in the hand mirror, I was satisfied and we went to the party. Trust me, everyone in the party appreciated my simple makeup which was really wonderful for me. After getting back home I saw myself in the mirror again and decided to share my experience with my lovely readers by showing  them with a picture tutorial step by step. In this post I have tried to show how I did my makeup with these five products in my car. I hope you'll enjoy this post and learn something. I have a request too, if you too have faced a situation like me, please share your experience with the readers & how did you face that situation successfully.


SHARE:

Tuesday, October 11, 2011

Dull golden & brown EOTD- photos, tutorial


I tried an EOTD using dull golds & brown shades...so wanted to share it with all my readers. Please take a look!
SHARE:

Wednesday, September 7, 2011

Ellis Faas Skin Veil Foundation- review, photos, FOTD

Hey pretty ladies,
Foundation is one of the most complicated things in makeup which sometimes seems impossible to get right one. You want a shade that matches your skin tones perfectly and in such a formula that is easy to work with, it must even out your complexion and hide imperfections.Which after applying should look  like nothing on your face at all. A foundation that made your skin flawless without showing on the face.
Recently I have found another great foundation….Ellis Faas Skin Veil Foundation Pen S102 is the another addition to my best foundations' collection.

Ellis Faas Skin Veil Foundation Pen S102


It’s a tinted foundation which comes in a clicky pen version.
SHARE:

Friday, August 5, 2011

Rouge Bunny Rouge Haighlighting liquid- Review, Swatches & FOTD tutorial

Hi pretty ladies,

Highlighter plays an important role in makeup & being without an highlighter is something like a room with all precious decorations but no lights! I didn’t know it’s importance earlier, and never tried to use a highlighter on my face because I had been thinking that I don’t need any highlighter but after learning some makeup tips I knew that highlighter is an essential part of our makeup. It doesn’t make our makeup loud but it gives a healthy and glowing look to our face. It highlights the lovely features of your face and makes your face the center of attraction. Anyways, after knowing its quality I tried many highlighters available in our market and realized their effect on my face but if you ask about my favorite highlighter ever, It's none other than Rouge Bunny Rouge Seas of Illumination Highlighting Liquid in Sea of nectar. I realized its quality after using only first time. Till then I have applied it many times and on the behalf of my own experience I can say without any hesitation that it’s my favorite highlighter ever. Today I’m going to review this lovely highlighter.

Rouge Bunny Rouge Seas of Illumination Highlighting Liquid- Sea of Nectar

It’s a

SHARE:

Thursday, August 4, 2011

Simple eye makeup created using Sleek makeup Oh So Special Palette

Hi Lovely ladies,
Today I wanted to share a simple eye makeup which is quite easy and comfortably can be done by anyone. I have used my Sleek Makeup Oh So special palette for this makeup. All colors I've used are matte so it's a very wearable look.
Hope you enjoy!!!!


Now let's have a look at this simple eye makeup tutorial:
SHARE:

Thursday, July 14, 2011

Colorful Eye Makeup Tutorial using Manly eyeshadow palette

Hey everyone!!
After the success of my first eye makeup Tutorial I thought of coming up with another one. This one was really fun to do & it's a bit dramatic. I've taken all the shades from my 80 color Manly eyeshadow palette from KKcenterHK which i reviewed yesterday- HERE.
Take a look & hope you like it & it helps!
Step I
SHARE:

Monday, June 13, 2011

Adorn Cosmetics DIY video Tutorial competition

Hey everyone,
Read on to find out something interesting that Adorn cosmetics is having!!

Adorn knows that women love to tell their friends about their can’t-do-without beauty tips and products so who better to tell the world about the fabulousness of Adorn products and how they are used, than YOU the experienced devotee of cosmetics!

SHARE:

Sunday, June 12, 2011

The Body Needs eyeshadows- Review+EOTD Tutorial

Hey ladies,
Hope you all had a great weekend!!! Mine was a bit tiring but anyways...hope you all enjoyed!!
So now thought of beginning this week with a review +eye makeup Tutorial. Check out this post:

Recently I got a chance to try out some eye shadows from The Body needs Mineral cosmetics so today decided to share it with you all.


These are the shades that I have at present (from L-R):

SHARE:

Saturday, May 14, 2011

Revlon Photoready foundation-Review, Swatches & photos(how to apply through a simple tutorial by pictures)

Hi ladies,

Hope everyone is doing well!!

As many of my readers already know that one of my favorite makeup brands is Revlon for sure!! My foundation, compacts, concealer, eyeliner, favorite lip shades etc etc…are all from Revlon as their products have never disappointed me.

Quite recently I’d reviewed Revlon Colorstay foundation and through that review you must have got an idea about how much I adore that foundation.

I was very excited on seeing Revlon’s Photoready range being launched in India as all the products in that range just looked fabulous. And now I’m just more than happy to review this Revlon Photoready foundation. Take a look guys and see what I have to say about this new Photoready foundation-


SHARE:

Wednesday, December 8, 2010

A QUICK LOOK JUST IN 10 MIN & I'M READY TO GO OUT!!

Some times it happens that we are in hurry not too well but suddenly we are insisted to go out somewhere by our brothers and sisters, our boy friends or hubby. We can’t refuse them but the question is what to do when we do not have much time to ready ourselves.
I know this moment often comes in your life. What do you do then? Either you go in a simple look or you take much time for yourself and listen to some unpleasant comments for it.
But next time when you face that moment you can pick some tips from here for your preparation. Believe me it will take only 10 minutes and you can get a simple but nice look.

For more advice on how to create a simple but nice look, you can look through this list of online colleges to find the right cosmetology degree for you.

10 minute look-
1-at first wash your face, wipe it and apply some moisturizer if you need. Take any stick foundation or compact which contains foundation in it. You can use Colorbar compact, Lakme magic, Mac compact plus foundation, Loreal roll on or Chambor stick foundation.
I have used here Chambor stick foundation. You need only 1 or ½ min for it.
2- Eyes
You have to spend some time for your eyes but maximum 5 min. Take any shadow palette choose a shade according to your dress. Now apply very lightly because we don’t need dark shade. You can take Maybelline palette, Chambor trio, Mac single color shadow, Lakme quartet, Rimmel trio or any other brand.
Here I have used Maybelline lilac shades and my dress was purple so it was matching.
You have to apply the shadow from inner corner to outer corner of your eyelids. No need to apply any shade on your brow bone but you can use a very light one if you want.
Take your mascara and use only one coat for your lashes. First upper lashes then lower lashes. It will be better if you have transparent mascara.

I have used Loreal Extra volume mascara.
3-Cheeks-
No need to apply blush on your cheeks. Sometimes our own skin glows without the blush.
I haven’t used any blush here.
4-Lips-
Only natural and light color lip gloss is what you need. Apply and press your lips over one another. You can choose natural shades from Revlon, Lakme, Maybelline, Mac, Loreal, Colorbar or any other.
I have used Colorbar transparent lip gloss.

Now brush your hair and leave it loose. Don’t tie, take your purse, wear your shoes and you are completely ready to go out anywhere. Come out from your room with a lovely smile and go with your partner. Don’t forget to look at your partner’s face who would be surprised to see you ready so soon.
Hey, where are you going Madam?
At least you should say thanks to me. Hahaha:))
SHARE:

Tuesday, November 2, 2010

Light smokey gray eyes: Look and Tutorial

Hi ladies,

It often happens that college going girls of even working women want to try a Smokey eye look....But they usually hesitate in doing so....Why???

1. Firstly they would think it to be dark look which would surely look odd.

2. Secondly these youngsters would feel such dark makeup would give an elderly and mature expression on their face. 

But no...I thought why not do a light Smokey eye look which can surely help these girls. 

Today I'm posting this look...Have a look!!

Face-

So first of all I applied light moisturizer on my face and then a very light coat of foundation. You can use a good concealer under your eyes or on any spot on your face. 

I haven't a used concealer here. After applying foundation, I gave very light touch of compact powder.

Cheeks-

I applied light pink blush on my cheeks with my Vega blusher brush and blended it well. I gave very light touch of blush on my forehead and chin also.Note- This should be a very light touch which will give you a glow.

Eyes-

I applied stick foundation on my eye lids in place of primer. You can use a primer.

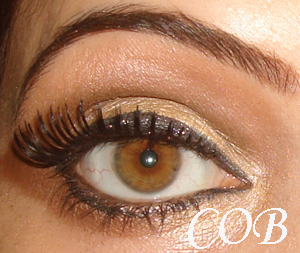
Then I applied gray shadow on my lids, from inner corner to the outer corner. I applied this shade only on my crease line then I took light silver white shade and applied it on the rest of my eyelids along with the brow bone. Blended it well. I gave a light touch of gray shadow in my lower lids with a thin brush.

Then I lined a thin line of liner and then mascara. You can use false lashes if you want. I have used lashes here.

Lips-

I used a very light pink lip liner to make an outline of my lips then filled it with the same colored lipstick.

I wanted to make it more light so I took a tissue paper and kept on my lips, pressed it and made the shade even more lighter.

And then it's done.

FACE:

Cheeks: I used- Chambor liquid foundation

              Revlon compact powder

              Chambor blush

EYES:

I used- Chambor stick foundation in place of primer

               Maybelline eyeshadow combo- Grey matters ( both shades)

               Revlon eyeliner in Black Beauty

               Revlon lash fantasy mascara

Lips:

I used- Colorbar liner in politely pink

          Loreal lipstick- Laetitia pink 706


And this was the full final look:

So guys hope you liked this look. Have a great and safe Diwali and an awesome weekend!!!!


SHARE:
© Chamber of beauty

This site uses cookies from Google to deliver its services - Click here for information.

Blogger Template Created by pipdig